
How to set up buffet table: Pro Tips for a Flawless Display
A stunning buffet doesn’t just happen. It’s the result of smart, strategic planning that starts long before a single dish is served. Think of it as your blueprint for a seamless event, the secret weapon that turns potential day-of chaos into a smooth, impressive flow.
Getting this pre-event strategy right is everything. It’s where you foresee challenges and build a solid framework so that when your first guest arrives, you’re calm, collected, and ready to host.
Crafting Your Buffet Blueprint Before the Big Day
The entire process really boils down to three core pillars: your guests, your menu, and your gear. Get these right, and you’re well on your way.
Solidify Your Guest Count
First things first: you need to know exactly how many people you’re feeding. Your guest count is the foundation for every other decision you’ll make, from how much food to buy to the physical space you’ll need. An accurate number is your best defense against running out of the crowd-favorite dish or dealing with mountains of wasteful leftovers.
Once your RSVPs are in, I always recommend adding a small buffer—maybe 5-10%—to account for any surprise plus-ones or last-minute stragglers. This final number is your north star for menu planning.
Design a Balanced and Practical Menu
With your headcount locked in, you can start building a menu that not only tastes incredible but also works for a buffet setup. The best buffet dishes are those that hold their temperature well and are simple for guests to serve themselves. A good rule of thumb is to offer a mix of proteins, starches, and a few vibrant salads for a well-rounded spread.
When you’re brainstorming dishes, keep these things in mind:
- Dietary Needs: Do you have vegetarians, vegans, or guests with common allergies like gluten or nuts? It’s always a good idea to plan at least one main and a couple of sides that cater to these needs.
- Complexity: This is not the time for fussy dishes that require last-minute assembly. Choose recipes that you can prep—or even fully cook—ahead of time.
- Serving Style: Is a buffet truly the best fit for your event? Sometimes a plated meal makes more sense. If you’re on the fence, it helps to weigh the pros and cons of each. You can learn more about choosing between buffet or plated service in our detailed guide.
A great buffet menu offers variety without being overwhelming. My go-to formula is two to three main dishes, three to four sides, one great salad, and bread. This gives everyone plenty of choice without overcomplicating your prep.
Conduct an Equipment Inventory
Finally, it’s time to take stock of your gear. Trust me, there’s nothing worse than realizing you’re short on chafing dishes or serving spoons minutes before the food needs to go out. A few days before the event, pull out every platter, bowl, and utensil you plan to use.
Go through your menu and assign a specific serving piece to each dish. This is where sticky notes become your best friend—label every single item. It might seem small, but this one step can transform a frantic setup into a calm, organized process.
Designing a Buffet for Smart and Seamless Guest Flow
A beautifully planned menu deserves a presentation that’s just as thoughtful. I’ve learned over the years that the real secret to setting up a successful buffet table lies in its flow—making it so effortless for guests to navigate that they don’t even have to think about it. A smart layout prevents awkward traffic jams and creates a dining experience that feels intuitive and relaxed.
Your design should always start right where your guests do: with an empty plate. Place your stack of dinner plates at the very beginning of the line. This is the universal, unspoken signal for “start here,” kicking off their journey down the buffet in a logical, organized way.
Map Out a Clear Path
Once plates are in hand, the path forward should be completely obvious. The time-tested industry standard is to arrange food in the order it would typically be eaten in a plated meal. You want to start light and build toward the heavier, heartier dishes.
Here’s a proven order that guides guests naturally:
- Salads and Cold Appetizers: These light starters should come right after the plates.
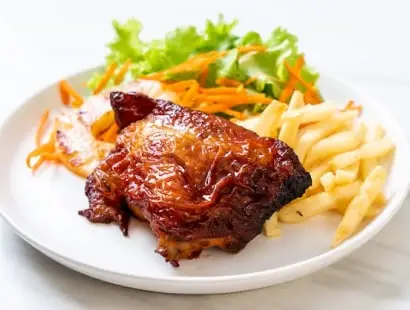
- Main Courses: Next, feature your primary protein dishes, like roasted chicken or a carved turkey. These are the stars of the show.
- Hearty Side Dishes: Follow the mains with heavier sides—think mashed potatoes, stuffing, or rich casseroles.
- Lighter Sides and Breads: Vegetables, dinner rolls, and butter should come near the end of the food line.
This logical progression helps guests build their plates without having to backtrack or second-guess. And here’s a game-changing tip: if you have the space, pull the table away from the wall to create a double-sided line. This one move can cut serving time in half for larger crowds, making it one of the most effective strategies out there for managing guest flow.
This infographic breaks down the core elements of buffet planning, from considering your guests to selecting the right gear.

As you can see, a seamless guest experience is the direct result of careful menu and equipment planning.
Strategically Place Utensils and Drinks
Here’s a pro tip that makes a huge difference: place napkins and utensils at the end of the line. I can’t tell you how many times I’ve seen guests awkwardly juggling silverware, a napkin, and their plate while trying to serve themselves. Putting them at the finish line allows for an easy, one-handed grab after their plate is full.
The most successful buffet setups are designed for ease, not just aesthetics. Think about what a guest is holding at each point in the line. Your goal should be to keep one of their hands free for as long as possible.
You should also create completely separate stations for drinks and desserts. Placing these away from the main food table is crucial for dispersing crowds. This simple tactic prevents a single bottleneck where people are trying to get their main course, refill a drink, and grab a slice of pie all in the same spot. It encourages movement and makes the entire space feel more open and accessible.
An efficient buffet setup is a key component of modern dining, enhancing the customer experience at events from weddings to corporate parties. For more on this, check out the insights on the role of buffet tables in the foodservice industry from IMARC Group.
Mastering Food Placement and Temperature Control
Beyond the flow of your guests, nothing is more important than the safety and quality of the food you’re serving. This is where the professionals really shine. Keeping dishes at their ideal temperatures isn’t just about taste—it’s a critical food safety requirement that separates a memorable event from a disastrous one.

The number one rule? Keep food out of the temperature “danger zone,” which is between 40°F and 140°F. In this range, bacteria can multiply at an alarming rate, creating a serious health risk for everyone enjoying your spread. The right equipment is your first and best line of defense.
Keeping Hot Foods Hot
For dishes meant to be served warm, consistency is everything. You need gear that can provide steady, reliable heat for the entire event, not just the first hour.
- Chafing Dishes: These are the gold standard for a reason. Using simple canned fuel, they maintain a consistent temperature, keeping everything from pulled pork to creamy pasta perfectly warm and safe.
- Slow Cookers: An absolute lifesaver for liquids and saucy dishes. Think meatballs in marinara, chili, or that crowd-pleasing queso dip. Just flip them to the “warm” setting, and they’ll hold the food at a safe temperature without overcooking it.
- Warming Trays: These electric trays are great for keeping casseroles, quiches, and other dishes warm right in their original bakeware.
Ultimately, a huge part of a successful buffet is mastering food temperature control for safety, which ensures every dish stays delicious and safe from the first guest to the last.
Pro Tip: Always preheat your equipment! Add hot water to your chafing dishes and turn on slow cookers about 20-30 minutes before you add the food. Dropping hot food into a cold device forces it to work too hard and might not bring the dish to a safe temperature quickly enough.
Keeping Cold Foods Cold
Maintaining the chill for your cold selections is just as crucial. Nobody likes a wilted salad or, worse, a side of potato salad that’s been sitting in the danger zone for too long.
An easy trick is to create simple ice baths by nesting your serving bowls inside larger containers filled with ice. This works perfectly for shrimp cocktail, creamy dips, or fruit salads. For a cleaner look, you can also find specialized serving trays with built-in ice compartments.
A Strategic Approach to Food Order
Here’s a little secret caterers have been using for years: the order of your food can be a clever tool for managing both your budget and your guests’ appetites.
Think about it. When people approach a buffet, they tend to take larger portions of the first few dishes they see. By placing less expensive, filling items like bread rolls, big green salads, and pasta salads right at the beginning of the line, their plates will already be partially full before they reach the pricier main courses, like that beautiful beef tenderloin or tray of shrimp scampi.
This simple adjustment helps ensure there’s enough of the star attractions to go around for everyone. It’s a small tweak to your buffet setup that can make a huge impact on your food costs and the overall success of the event.
To make things easier, here’s a quick-reference guide for some common buffet items.
Food Safety and Serving Temperature Guide
This table outlines the ideal holding temperatures and recommended equipment for common buffet dishes to ensure both food safety and quality.
| Food Category | Ideal Holding Temperature | Recommended Equipment |
|---|---|---|
| Hot Soups & Sauces | 140°F or above | Slow Cookers, Soup Kettles |
| Hot Meats & Entrees | 140°F or above | Chafing Dishes, Warming Trays |
| Casseroles & Bakes | 140°F or above | Chafing Dishes, Warming Trays |
| Cold Salads | 40°F or below | Bowls nested in Ice Baths |
| Deli Meats & Cheeses | 40°F or below | Chilled Platters, Trays on Ice |
| Dips & Dressings | 40°F or below | Bowls in Ice Baths, Chilled Crock |
| Desserts (Cream-based) | 40°F or below | Refrigerated Display, Trays on Ice |
Using this guide as a starting point will help you plan your equipment needs and keep your guests happy and healthy.
Styling Your Buffet to Create a Wow Factor
A well-styled buffet table does more than just hold food; it becomes the visual heart of your entire event. Once you’ve nailed the basics of flow and temperature control, it’s the aesthetic details that really elevate the experience from a simple meal to something truly memorable for your guests. These are the presentation secrets that will show everyone you know how to set up a buffet table that truly impresses.

If there’s one trick I’ve learned over the years, it’s this: play with height. A flat, one-level spread just looks monotonous. Creating different elevations, on the other hand, adds immediate visual pop and dimension. It’s the single most effective way to get that professional polish.
Elevate Your Presentation
You absolutely do not need a bunch of expensive, specialized gear to pull this off. It’s all about getting creative with items you might already have or can easily track down. This simple technique draws the eye across the table and, frankly, makes the food look even more appealing.
Here are a few of my go-to methods for building height:
- Cake Stands: They’re not just for desserts! Use them to showcase a beautiful bowl of bread rolls or a platter of your signature appetizers.
- Wooden Crates: Flip a few wooden crates or sturdy boxes upside down and hide them under your tablecloth. They create broad, stable platforms perfect for heavier dishes.
- Dedicated Risers: If you host events often, investing in a set of acrylic or metal risers is a smart move. They offer a clean, modern look and are built to last.
By staggering these different levels, you create a dynamic landscape that guides your guests’ eyes from one delicious option to the next. The goal is to make the display as exciting as the food itself. For a deeper dive into these techniques, explore our guide on essential plated and buffet food presentation secrets.
Create a Cohesive Theme
Your buffet’s styling should feel like a natural extension of your event, not an afterthought. You achieve this by coordinating your linens, serving platters, and small decor items with your overall theme or color scheme. A simple white tablecloth is always a crisp, clean canvas, but a textured runner can add a fantastic pop of color.
Think of your buffet table as a stage and the food as the main act. Your linens, platters, and decor are the set design—they should support the performance without stealing the show.
To really nail the visual appeal of your spread, check out some inspiring table setting ideas that can complement your theme and build an unforgettable ambiance. It’s no surprise that the global buffet table market, valued at around USD 1.2 billion in 2024, is growing—people are craving these kinds of stylish, experience-focused dining setups.
The Power of Clear Signage
Finally, never, ever underestimate the power of clear, stylish food labels. Small, well-designed signs are such a thoughtful touch, but they also serve a critical function. They instantly answer the “What is this?” question, which keeps the line moving smoothly and prevents bottlenecks.
More importantly, these labels are a huge part of guest safety and comfort. Clearly marking dishes that are vegetarian, gluten-free, or contain common allergens like nuts shows your guests that you care. It’s a small detail that makes a huge difference, allowing everyone to enjoy the meal with confidence. That’s what turns a good buffet into a great one.
Your Day-Of Buffet Setup Timeline and Checklist
You’ve done all the planning, and now it’s game day. Executing your buffet setup with calm confidence comes down to one thing: a solid timeline. When you break the process into manageable chunks, that frantic last-minute scramble simply disappears, letting you focus on what really matters—your guests.
A clear game plan is the secret to transforming a potentially stressful setup into a smooth, organized flow. This timeline will guide you from the early hours right up to the moment the party starts.
The Hours Before Guests Arrive
This is where you lay the groundwork. The goal here is to get everything in place that doesn’t involve perishable food, creating a clean canvas for your culinary display.
- 4-6 Hours Out: Get your buffet tables and any separate drink or dessert stations into position. Now’s the time to lay down your linens and smooth out every wrinkle. Go ahead and arrange your empty serving dishes, platters, and risers according to the layout you already planned.
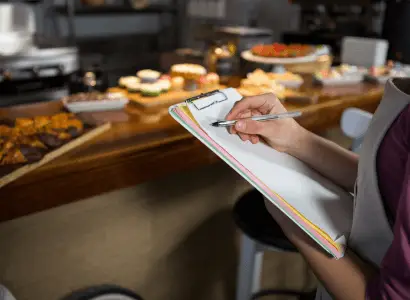
- 2-3 Hours Out: Next, set out all the non-perishable items. This means plates, napkins, utensils, salt and pepper shakers, and any condiments that are fine at room temperature. You can also place your labeled food cards next to each corresponding empty dish, which saves a ton of guesswork later.
Pro Tip: If you’re managing a bigger event, you can’t do it all yourself. Assign one person to be the “Buffet Captain.” Their only job is to watch over the buffet during the event—discreetly wiping spills, consolidating platters as they empty, and letting the kitchen know when a dish needs refilling.
The Final Hour Countdown
The last 60 minutes are when your buffet truly comes to life. The focus shifts entirely to food placement, temperature control, and those final presentation touches. Timing here is everything. You want every dish to be fresh, safe, and served at its absolute peak. This is where mastering the art of cooking for large groups really pays off.
60 Minutes to Go
Pull all your cold dishes from the refrigerator. Arrange items like salads, cheese platters, and chilled appetizers on the table, placing them in their pre-chilled bowls or on ice baths if needed. This gives them a moment to acclimate slightly without ever entering that dreaded temperature danger zone.
30 Minutes to Go
It’s time to light the fuel for your chafing dishes. Give them a solid 15-20 minutes for the water to get hot enough to do its job properly. While they’re heating up, you can start bringing the hot food out from the kitchen and placing it into the chafing dish pans.
15 Minutes to Go
Place those hot food pans into the now-preheated chafing dishes and pop the lids on. Fill up your bread baskets and make any last-minute tweaks to the decor. This is your chance for one final visual sweep of the entire setup.
5 Minutes to Go
Okay, it’s showtime. Remove the lids from the chafing dishes. Your buffet is now officially open and ready to welcome that first wave of hungry guests. With this structured approach, you can be sure every dish is perfect from the moment your event begins.
Even after you’ve planned every last detail, questions always pop up. That’s just part of the process. Learning how to set up a buffet table that truly works is an art, and figuring out the little dilemmas on the fly is how you master it. Let’s tackle some of the most common questions hosts run into.
How Much Food Do I Really Need for a Buffet?
Figuring out quantities can feel like a total guessing game, but there’s a solid rule of thumb I’ve relied on for years. Start with the “one-pound rule”: plan for roughly one pound of total food per adult guest. This doesn’t include dessert or drinks, but it’s a fantastic baseline that helps you avoid running out of food or dealing with mountains of leftovers.
Once you have that number, you can get more specific with your dishes:
- Main Protein: I usually aim for about 6-8 ounces per person. If you’re serving two show-stopping mains (like a brisket and a salmon), you can safely drop that to 4-5 ounces of each.
- Side Dishes: Plan on about 4 ounces (roughly a half-cup) of each side for every guest.
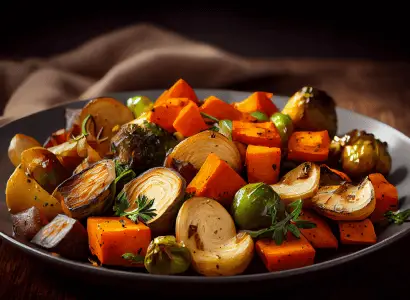
A little pro-tip? It’s always a smart move to have a bit extra of the less expensive, filling sides—think potato salad, roasted vegetables, or a big pasta dish. Trust me, it’s much better to have some delicious leftovers than to see a crowd favorite disappear halfway through the party.
What Is the Best Order for Food on a Buffet Line?
The sequence of your dishes has a huge impact on how smoothly your buffet line moves. To create an intuitive path for your guests, you want to follow the natural order of a meal.
Always start the line with plates, then flow into salads and other cold starters. After that, it’s time for the main courses, followed by all the delicious side dishes. Breads, rolls, and butter should be placed near the end of the food line. This logical progression helps everyone build their plate without backtracking or getting flustered.
A game-changing move to prevent a major traffic jam is to put drinks and desserts on a completely separate table. This strategy breaks up the crowd and encourages people to mingle away from the main food line.
Where Should Utensils Go in a Buffet Line?
It seems logical to put them at the start, right? But placing utensils first forces guests to awkwardly juggle their silverware, napkin, and plate while trying to serve themselves food. It’s a recipe for spills and frustration.
Instead, always place forks, knives, and spoons at the very end of the line, right after the last food dish. Bundling them in napkins makes for an easy, one-handed grab once their plate is full. It’s a small change that makes a huge difference in the guest experience.
At Culinary Collective Atl, we create flawless dining experiences, from intimate dinners to large-scale buffet events. Let our expert chefs handle every detail so you can relax and enjoy the moment. Discover our private chef services.